Thursday, April 06, 2006

Biztalk - Adding a ReceiveLocation

the following code show how to create a ReceivePort and its corresponding receive Location using Microsoft.BizTalk.ExplorerOM:

private void CreateReceivePort(BtsCatalogExplorer catalog)
{
   Application app = catalog.Applications["FirstIntegration"];

   ReceivePort port = app.AddNewReceivePort(false);
   port.Name = "TestReceiveport";

   port.PrimaryReceiveLocation = port.AddNewReceiveLocation();
   port.PrimaryReceiveLocation.Name = "FileReceive";
   port.PrimaryReceiveLocation.TransportType = catalog.ProtocolTypes["FILE"];
   port.PrimaryReceiveLocation.ReceiveHandler = catalog.ReceiveHandlers[0];
   port.PrimaryReceiveLocation.Address = @"c:\infiles\*.xml";
   port.PrimaryReceiveLocation.ReceivePipeline = catalog.Pipelines["Microsoft.BizTalk.DefaultPipelines.XMLReceive"];

   catalog.SaveChanges();
}

remember to add Microsoft.BizTalk.ExplorerOM reference located under the developer tools folder of your biztalk folder and System.Management, if you want an easy way to get the connection string use Carlos Medina's Get the connection string to BizTalkMgmtDb

Avalon ResourceDictionary

the following is a simple example on how to use resource dictionaries using just XAML for TextBlocks:

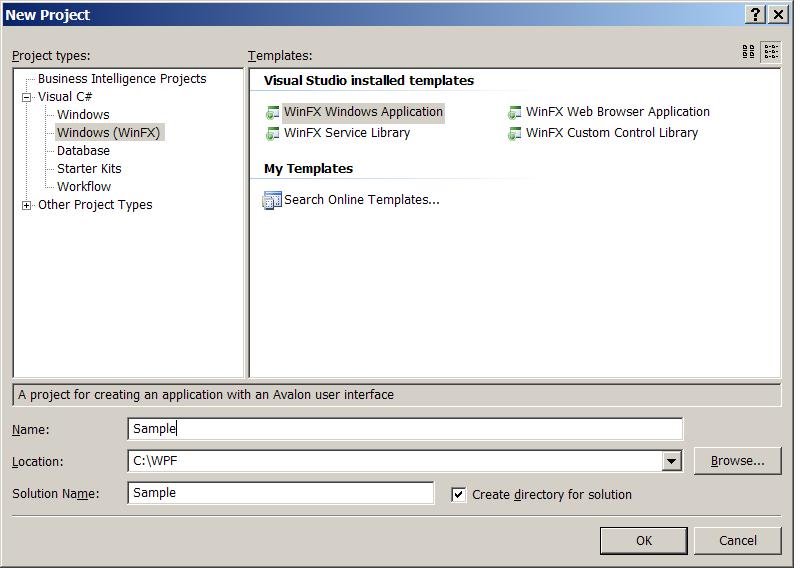
1) Create an empty WinFx solution

projectCreation
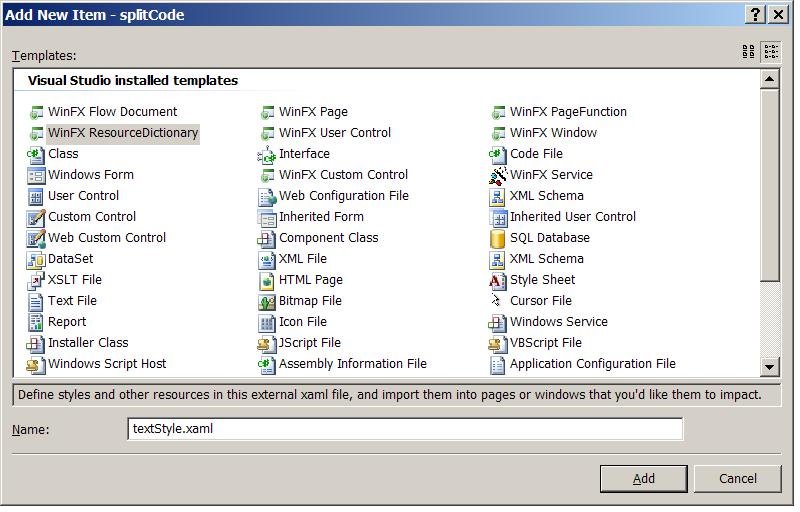
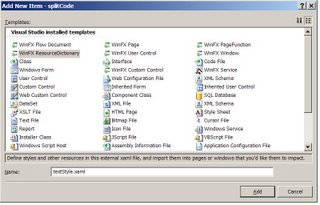
<2) Add a ResourceDictionary using add - new Item from the context menu, i'll name it testStyle.xaml but feel free to use any name:


3)Add the following description to your file
  <ResourceDictionaryxmlns:x="http://schemas.microsoft.com/
winfx/xaml/2005"    
  xmlns="http://schemas.microsoft.com/winfx/avalon/2005">   
      <Stylex:Key="myTestStyle" TargetType="{x:Type TextBlock}">   
          <SetterProperty="Background" Value="Green" />   
          <SetterProperty="Foreground" Value="White" />   
          <SetterProperty="FontSize" Value="40"/>   
      </Style>   
  </ResourceDictionary>

4) Add the following XAML to the window1.xaml
  <ResourceDictionary 
xmlns:x="http://schemas.microsoft.com/winfx/xaml/2005" 
xmlns="http://schemas.microsoft.com/winfx/avalon/2005">
     <Style x:Key="myTestStyle" TargetType="{x:Type TextBlock}">
         <Setter Property="Background" Value="Green" />
         <Setter Property="Foreground" Value="White" />
         <Setter Property="FontSize" Value="40"/>
     </Style>
  </ResourceDictionary>

on these lines you see the resource include for the testStyle.xaml file.

now, the complete xaml you look like this: 

1:  <Window x:Class="sample.Window1"
2:      xmlns="http://schemas.microsoft.com/winfx/avalon/2005"
3:      xmlns:x="http://schemas.microsoft.com/winfx/xaml/2005"
4:      Title="WPF sample"
5:      >
6:      <Window.Resources>
7:          <ResourceDictionary 
          x:Name="testStyle" Source="testStyle.xaml">
          </ResourceDictionary>
8:      </Window.Resources>
9:      <Grid>
10:          <Grid VerticalAlignment="Center" 
          HorizontalAlignment="Center" Width="200" Height="100">
11:              <Grid.ColumnDefinitions>
12:                  <ColumnDefinition/>
13:              </Grid.ColumnDefinitions>
14:              <Grid.RowDefinitions>
15:                  <RowDefinition/>
16:              </Grid.RowDefinitions>
17:              <TextBlock 
18:                  Style="{StaticResource myTestStyle}" 
19:                  Name="ValueLabel" 
20:                  VerticalAlignment="Center" 
21:                  HorizontalAlignment="Center" 
22:                  Grid.Column="0" 
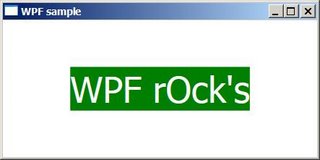
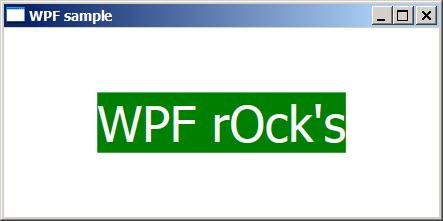
23:                  Grid.Row="0">WPF rOck's
24:              </TextBlock>
25:          </Grid>
26:      </Grid>
27:  </Window>


as you can see, the style is applied using StaticResouce myTestStyle, it should be very straight forward.

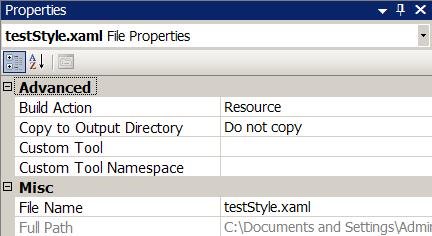
5) prior to compilation is very important to modify testStyle.xaml's properties in order to identify it as a resource file, this is easily acomplished by right-clicking the file, selecting properties and changing the build action to resource, the following image shows the final result:


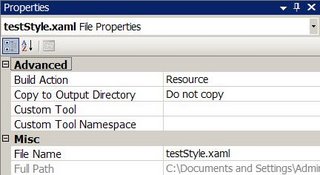
skipping this step willl result in a runtime error.

6) Run the application and play with it

Wednesday, April 05, 2006

WCF Channel Mode

i strongly recommend checking Yasser Shohoud's channel mode posts, think they might come handy:

Meet the WCF Channel Model - Part 1
Meet the WCF Channel Model - Part 2
Meet the Channel Model: ICommunicationObject
WCF Architecture Overview

read on!!!!

Macs do Windows too

i think this is worth mentioning:

"More and more people are buying and loving Macs. To make this choice simply irresistible, Apple will include technology in the next major release of Mac OS X, Leopard, that lets you install and run the Windows XP operating system on your Mac. Called Boot Camp (for now), you can download a public beta today."

of course you'll need an intel-based Mac but think of the market impact on this one.
read more

FxCop 1.5 RC

FxCop 1.35 RC1 has just been released according to the information published on the FxCop blog. You can download the FxCop installer(s) from GotDotNet community website. it is important to Remember that FxCop 1.35 needs the .NET Framework 2.0.

i also recommend you to check FxCop Managed Code Analysis forum

WPF

if you have been working with Windows Presentation Foundation -A.K.A Avalon- lately, i recommend reading the following articles/blogs so you are up to date with the changes introduced on the latest CTP bits:

ModelVisual3D -- Changes to WPF 3D
ModelVisual3D vs. Model3DGroup -- When to use which?

i also found this tutorial very helpful, it is already updated BTW

right now i'm re-writing my old apps -nothing fancy though-, hope all come together.

PS: i really recommend you guys adding Daniel Lehenbauer's blog to your aggregator